Thursday, 12 January 2012

Download Facebook Chat Instant Messenger !


Chit Chat for Facebook is a free instant messenger that allows you to chat with all your Facebook contacts.
Chit Chat connects to Facebook Chat and removes the need to use a web-browser to talk over Facebook Chat.Benefits of Chit Chat for Facebook
  • Fun and Free – Convenient and fun way to chat with your Facebook contacts without the hassle of surfing Facebook
  • Free Your Web-Browser – No need to keep your web browser logged into Facebook
  • Easy To Use – Download, install and then login with your Facebook username and password – easy!
  • Popular? – Swift and fast tabbed chat Interface making it easy to talk to many friends at once
  • Instant Message Notification – Lets you know when you receive an instant message.
Below: Chit Chat Tabbed Message Window


Above: Chit Chat Buddy List
System Requirements: Windows XP,Vista,7

                                        click here to download chit chat messenger fo facebook

2010-06-23 – A minority of our users of Facebook Messenger users have encountered and error on Chit Chat that reads “Login Failed. Please Try again.” The issue can be resolved by modifying your Facebook account settings. Read the solution to a Failed Chit Chat for Facebook Login here.

Force Windows to Shutdown in Less than 10 Seconds

Force Windows to Shutdown in Less than 10 Seconds

When you first install windows on your computer you notice that windows boot and shutdown in less than 10 seconds. But after some time and after installing different software’s and antiviruses it began to slow down and some time it takes more than a minute to boot or shut down. What happens that when you install software’s they make changes into your windows registry like load software’s at boot time etc. Same is the case with windows shutdown, Windows always wait for running programs to kill themselves for specific time. This approach can take your computer shutdown time to go over one minute which is of course very annoying. But today i am going to tell you a very unique computer tips and tricks and with the help of some registry commands you can force windows to shutdown in less than 10 seconds.

Force Windows to Shutdown in Less than 10 Seconds

How to make Windows Shutdown Faster:
1. First click on windows Start button and than type RegEdit in Run command box.
2. Now find this registry key. HKEY_CURRENT_USER/Control Panel/Desktop
3. When you find the key, simply Right click on right side of the Editor and select New String Value.
4. Rename the new key value to HungAppTimeOut and hit enter.
5. Double click on newly created key entry and enter 1000 which is equal to 10 seconds.
6. Close the Registry Editor and reboot your system to check the new faster shutdown.

Convert 1GB Memory Card into 2GB

Convert 1GB Memory Card into 2GB

With the invention of a micro chip world become revolutionize and world became paper less. Than personal computer came into existence and everybody have this luxury at there homes. Now even your smart phones have enough memory to store all you data and this can be expanded more by memory cards. Yes memory cards are used every where and in variety of gadgets. All people like to have memory cards now a days and specially 1 GB memory card is the most common between them. Some times 1 GB memory card is not enough for all your needs and you have to buy a new one. But what if you can convert your 1 GB memory card into 2 GB in size with the help of a software.


Convert 1GB Memory Card into 2GB

How to convert 1 GB Memory card into 2 GB in Size:
1. First copy all your data from memory card into safe place because we are going to format it.
2. Download Free software Skymedi 2GB Fix given at the end of this post and unzip it.
3. Right click on Unzipped file and select “Run as Administrator“.
4. Now select the memory card drive from the drop down menu and click on Fix button.
5. Click on Refresh Button to see the new space of your memory card.
Note: This trick is only applicable to 1 GB memory card only.
Download: Skymedi 2GB Fix

Change Windows 7 System Properties Logo


Change Windows 7 System Properties Logo

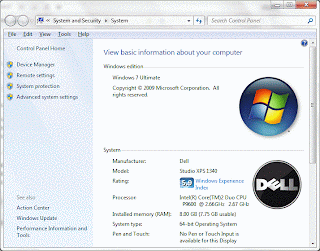
Ever wanted to change the default windows logo in windows 7 system properties with your own custom one or with Apple’s logo. Its human nature that with time he tends to get bore with old things and same is happen with Windows users. Every day you see same windows interface with same folder icons, Windows themes, Wallpapers and default windows icons. But not many people think like that. They produce small utilizes for us so that we can customize the windows with time to time. This will surely produce interest in windows and hence you can enjoy our work


Change Windows 7 System Properties Logo

When you press windows logo + pause/break button, you will see Windows system properties box with all the information and default orb style logo. The way we are going to change the default orb style logo with our custom one is by using a small utility named as Windows 7 System Properties Logo Changer. This is a free utility and it changes the windows 7 properties logo with the help of some registry tweak. This software is fully test and used by us so don’t worry if you have any concerns.
How to Change Windows 7 System Properties Logo:
1. All you have to do is to downloadWindows 7 system properties Logo Changer from the link given at the end of this post.
2. The file is in Zip format so you need Winzip in order to extract it.
3. After unzipping Right click on the Execute-able file and select “Run as Administrator” from the menu.
4. Now create your own logo or choose from a pre-build logos and click Apply button.
5. After that click the Check button or press windows logo + pause/break button to see the effect.
6. Don’t worry if you dont like the new logo you can always go back to the original log by pressing the Restore button.


Make Windows 7 Windows Experience Index Score to 7.9


Make Windows 7 Windows Experience Index Score to 7.9

I have seen many new laptops and newer desktop machines with relatively lower Windows Experience Index score. The average Windows Experience Index score for normal computer is something like 3.0 to 4.0(out of 7.9) which i think is very low. Computer systems grow over the years and now we have some of the fastest machine’s available in the market and in our homes. One cannot understand why Windows is still showing low Windows Experience Index score for newer systems. Most of the time its your system Desktop Performance for Windows Aero which let your Score down. So you have two choices to increase your windows 7 Windows Experience Index Score. One is that you upgrade your computer with proper things and other is via Windows Trick.

Make Windows 7 Windows Experience Index Score to 7.9

When building a new computer many people try to install the latest and heaviest processor in order to make there system fast. But its not only processor that make your computer perform fast. You also have to match the Motherboard and Ram bus speed with your Processor in order to perform your processor at its full potential. Another thing which most people forgot is buying Graphics card for there system. Its very essential if you want your computer to perform at its full speed that you install latest graphics card.
How to Change Windows 7 Windows Experience Index Score:
1. Open MY Computer from your Desktop or from Start Menu and locate the following directory. C:/Windows/Performance/WinSAT/DataStore
2. You should see many files including “Formal.Assessment (Initial).WinSAT“. Just open this file via Notepad and find the term  <SystemScore>.
3. You should see some numeric value after the tag. Change this numeric value to something you like(7.2 etc) and save the file.
4. Now close the directory and return to your Windows Desktop.
5. Press Windows Key + Pause/Break key in order to see the result.

Now Transform Windows 7 Into Windows 8

After the successful release of windows 7, Microsoft has some how regain its reputation and now they are working on a new operating system which will even revolution the way we use computers. Microsoft is working on a new operating system named as windows 8 and has release some of its GUI features. Microsoft says that the main difference between windows 8 and its previous versions is that it supports touch screen devices as well. Because the future is all about touch devices and even computers are going to be touch.

Now Transform Windows 7 Into Windows 8

Omnimo is a windows 8 transform pack for windows 7 which will totally transform your windows 7 GUI into Windows 8 GUI with touch slabs. Don’t worry
if you have not yet buy a touch device you can operate it with mouse and keyboard as well. What Microsoft has done is totally remove the icons and place new big and informative tiles which will really revolution the way we use windows before. Windows 8 will start in less than 10 seconds and after boot you will see tiles instead of desktop so that you can quickly start you tasks without even further wasting your time.
How to Install the windows 8 theme:
1. First you need to download Rainmeter and install it in order to install the theme.
2. Then download Omnimo theme  and double click the file SETUP.rmskin to install it via Rainmeter.